
Development of this version of the 803 Emulator was prompted by the release of the Raspberry Pi 4 in June 2019. Earlier versions of the Pi had supported OpenGL ES 2 in full screen mode but this was the first version to support openGL ES 3 and to provide integration with X Windows so that an open GL ES scene can be rendered in a GTK window.
There have been many previous version of the 803 Emulator stretching back over 30 years. They used a variety of different graphics libraries to draw the numerous components of the machine. In respect of the number of machine components included, the current version is actually a big step backwards!
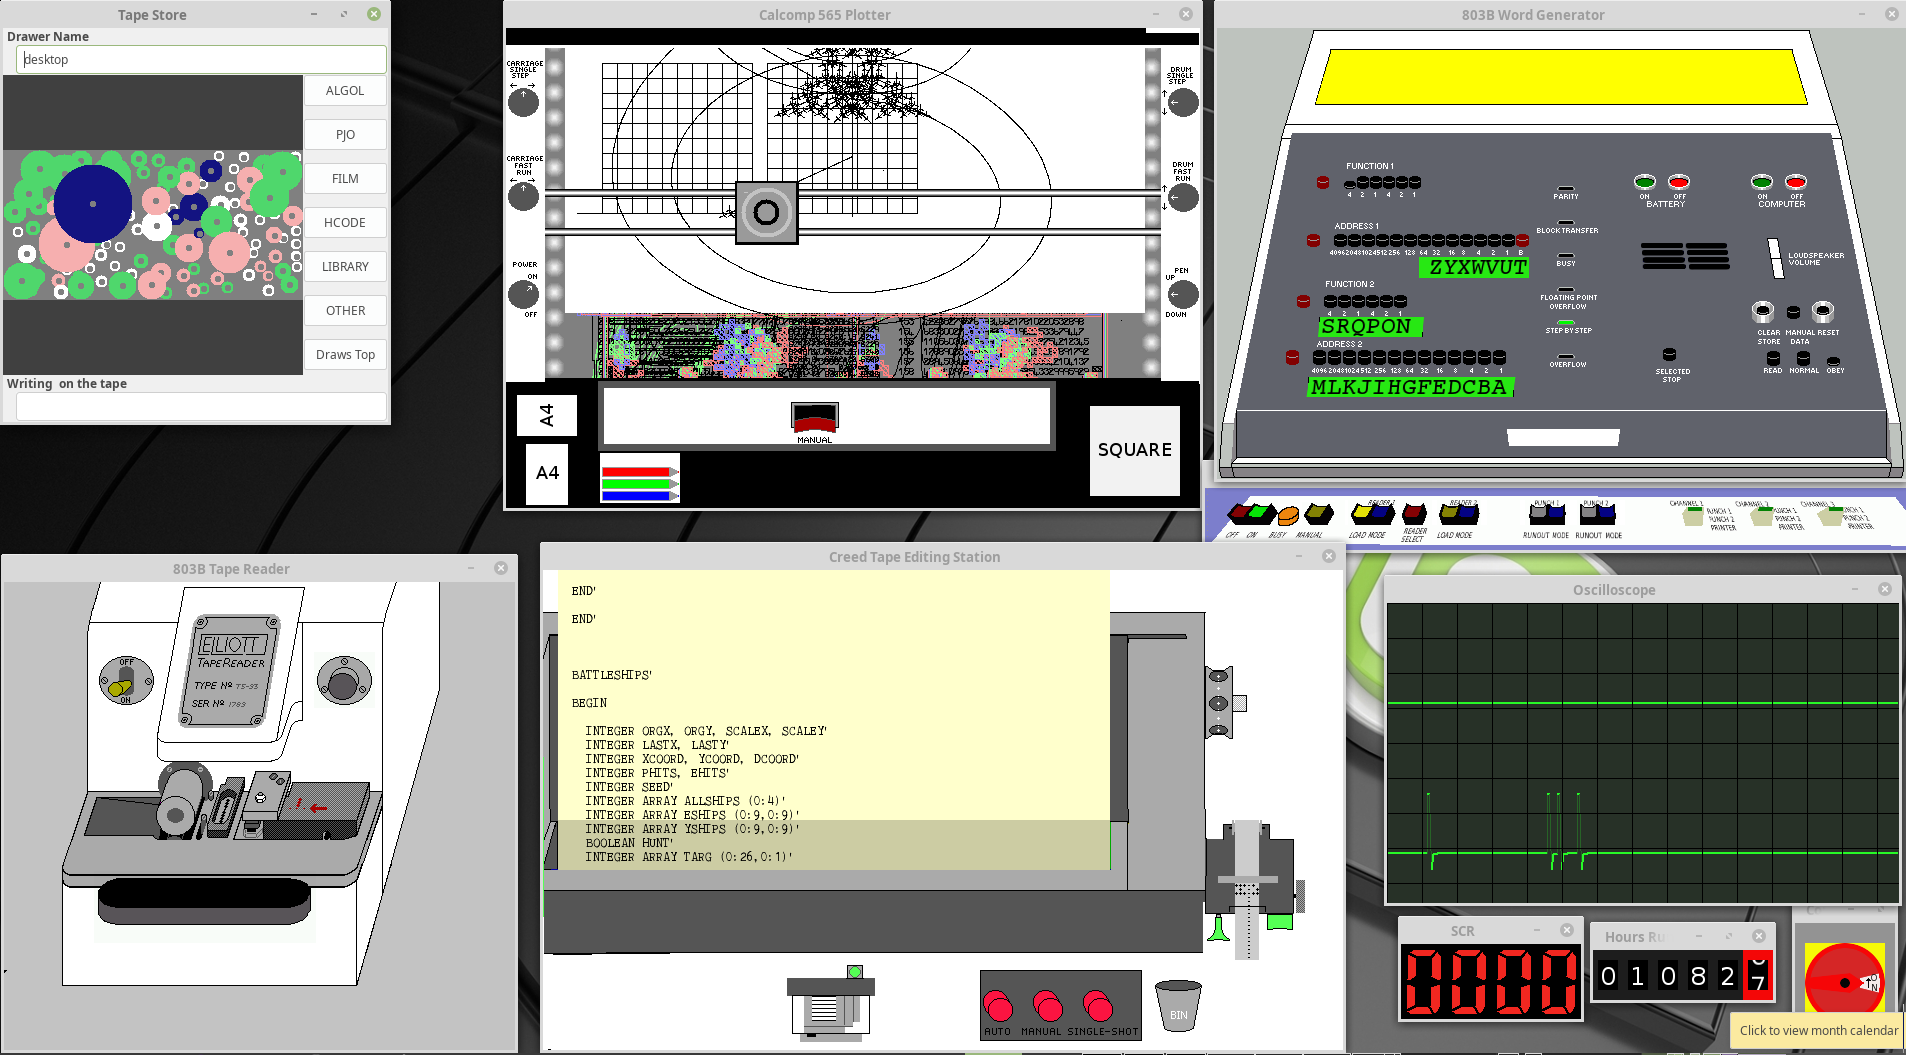
This is the last version that was based on GTK2 and you can see there are many more components included:
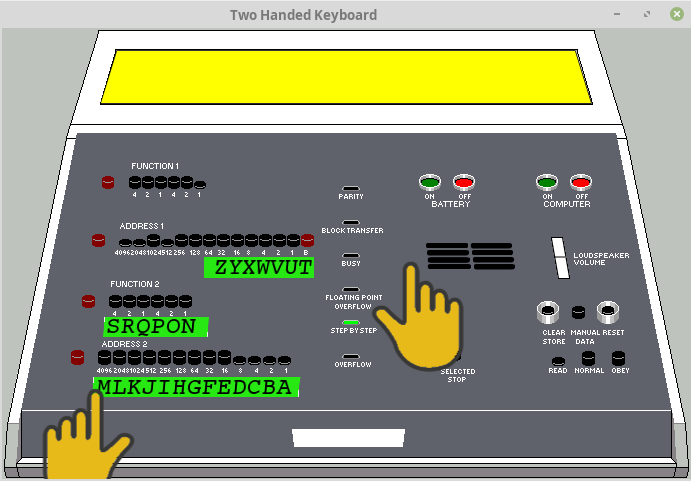
Development using two hands began in an early GTK3 version:
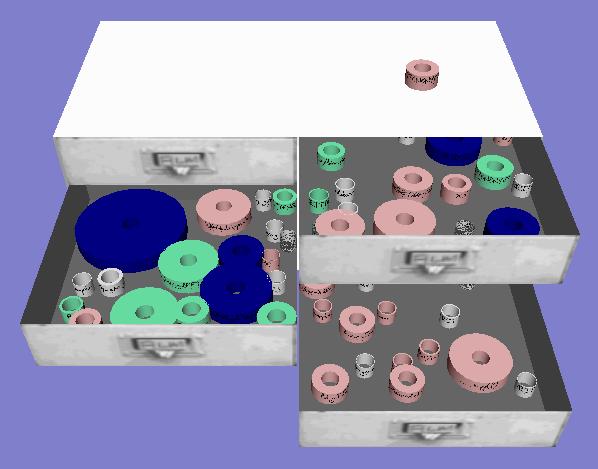
A much older GTK2 version had included some OpenGL 2 elements such as a set of drawers for holding paper tapes:
The plan is to add further hardware components over the coming months, starting with a full 3D version of the Calcomp plotter.
There are a number of tools and libraries that are needed to build the emulator application.
If you don't already have a C compiler installed on your system, add the "build-essential" package to the command below.
sudo apt install automake autogen libtool git cmake libgtk-3-dev libgles2-mesa-dev libasound2-dev libiberty-dev
Other packages will also be installed to meet all the dependencies.
The package names used above apply for Debian derived distributions and may be different on other distributions.
git clone https://github.com/recp/cglm.git

cd cglm

sh autogen.sh

./configure

make

make check

sudo make install

sudo ldconfig
The 803 Emulator is hosted on github.
To build the emulator run
git clone https://github.com/PeterOGB/3D803-V1.git

cd 3D803-V1

cmake .

make
The emulator can be run from the build directory or installed in /usr/local/
To place the executable into /usr/local/bin and other resources into /usr/local/share/803-Resources run
sudo make install

The position and viewing direction of the 3D camera is controlled by a combination of keyboard key presses and mouse movements.
[Developer Note: I use a tracker ball rather than a conventional mouse, so it could be that my choices of keys and
motion may not be the best when using a mouse. Let me know if you think it could be improved.]
| Motion | Keys |
|---|---|
| Pan and Tilt | Shift |
| Rotate and Up/Down | Shift + Control |
| Left/Right and Forwards/Backwards | Control |
Controlling two pointer-like objects on the screen takes a bit of getting used to. There is still only one mouse pointer and most of the time one of the hands (referred to below as the active hand) is tracking its position so the mouse pointer itself can be hidden.
The active hand is constrained to stay over the console so the mouse pointer only becomes visible when the hand reaches an edge and stops tracking the mouse. When the mouse pointer moves back over the console the active hand starts to track the mouse again, starting from its previous position. This prevents any unrealistic jumping around the screen by the hands.
To avoid having to deal with situations where the two hands would touch, the inactive hand is automatically moved left or right to keep the left hand to the left of the right hand or to keep the right hand to the right of the left hand.
After trying several techniques this seems the most intuitive.
Pressing the left mouse button will press the console button under the left index finger.
Pressing the right mouse button will make the right hand the active hand and it will start to track mouse movements
Pressing the right mouse button will press the console button under the right index finger.
Pressing the left mouse button will make the left hand the active hand and it will start to track mouse movements
The OPERATE bar (see below) is depressed by simply moving the active hand down over it. The hand will be vertically constrained once the bar is fully pressed.
803 --help
Usage:
  803 [OPTION…] - Elliott 803 Emulator

Help Options:
  -?, --help               Show help options
  --help-all               Show all help options
  --help-gtk               Show GTK+ Options

Application Options:
  -l, --loadcorefile       Load the core store from file.
  -s, --savecorefile       Save the core store to file.
  -w, --windowsize         Window size as widthxheight.
  -h, --handswap           Use old (right click) hand swap method.
  -D, --device             Select ALSA output device.
  --display=DISPLAY        X display to use
These options are used to load and save alternative core store images.
The default window is 800x600 pixels and (currently) cannot be resized. Use this option to change the window size e.g. "-w 1024x768" .
Earlier versions of the emulator used the right mouse button to toggle between left and right hands. This option reverts to that behaviour.
The emulator depends on the sound output running at 48kHz sampling to maintain the correct instruction execution rate. It has been found that some video/audio conferencing tools can cause the sample rate to change on already opened sound streams. This is probably a bug ! When it happens the rate changes from 48kHz to 44.1kHz making the emulator run ~8% slow. The same effect has been observed with sound from other applications causing speech and music to sound "flat".
This option has been added to allow an alternative output device to be used if one is available.
ALSA device naming is a bit archaic. Use aplay -L to get a list of the available ALSA devices. The list below shows an edited version of the output with HDMI and surround sound and other inappropriate devices removed (for brevity). Suitable device names are shown in bold . Names starting with "plug" can be used if the underlying hardware does not support 48kHz signed 16 bit little endian sampling. This is why "hw:CARD=M2X2,DEV=0" is not in bold as it only supports 32 bit samples.
aplay -L
default
    Playback/recording through the PulseAudio sound server
null
    Discard all samples (playback) or generate zero samples (capture)
pulse
    PulseAudio Sound Server
sysdefault:CARD=PCH
    HDA Intel PCH, ALC221 Analog
    Default Audio Device
front:CARD=PCH,DEV=0
    HDA Intel PCH, ALC221 Analog
    Front speakers
.....
hw:CARD=PCH,DEV=0
    HDA Intel PCH, ALC221 Analog
    Direct hardware device without any conversions
plughw:CARD=PCH,DEV=0
    HDA Intel PCH, ALC221 Analog
    Hardware device with all software conversions
.....
hw:CARD=Pro,DEV=0
    SB X-Fi Surround 5.1 Pro, USB Audio
    Direct hardware device without any conversions
plughw:CARD=Pro,DEV=0
    SB X-Fi Surround 5.1 Pro, USB Audio
    Hardware device with all software conversions
....
hw:CARD=M2X2,DEV=0
    M-Track 2X2, USB Audio
    Direct hardware device without any conversions
plughw:CARD=M2X2,DEV=0
    M-Track 2X2, USB Audio
    Hardware device with all software conversions
See https://www.volkerschatz.com/noise/alsa.html for some more info on ALSA, and a useful tool called "alsacap" which gives more details on each devices capabilities
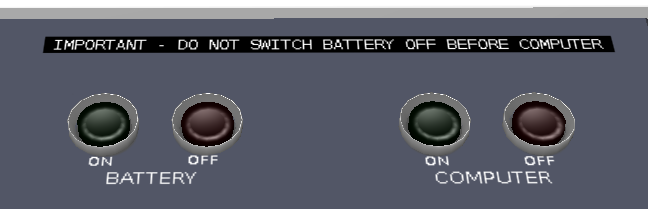
The 803's power supply includes a large NiCd battery that could keep the CPU running for a few seconds during a short mains failure or brown out. These were more common in the 1960s. In normal operation the battery is floating across the battery charger output with the battery charger providing the power needed to actually run the 803.
The BATTERY ON and BATTERY OFF buttons control the mains supply to the battery charger and connect and disconnect the battery and the charger.
The COMPUTER ON and COMPUTER OFF buttons connect and disconnect the battery and the computer.
The control circuitry keeps the battery connected to the computer during a mains failure, but disconnects them before the battery voltage drops too low. Although this behaviour is modelled inside the emulator, it's not obvious because there is no display of the battery charger voltage and current meters in the current release. These meters will be added in a later release.
The Dymo tape warning about switching the battery off first was attached to the console of the 803 at Loughborough Grammar School.
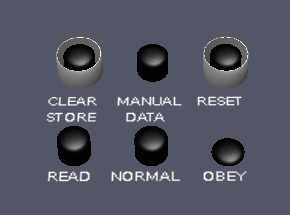
The lower three buttons READ, NORMAL and OBEY are radio buttons so only one can be pressed at a time. These determine the action taken when the OPERATE bar is pressed.
READ The Instruction set on F1 and N1 of the word generator (see below) is transferred to the instruction register ready to be executed.
NORMAL The instruction in the instruction register is executed, and the normal fetch / execute cycle continues. The machine is said to "running" and the STEP BY STEP lamp is extinguished.
OBEY After the instruction in the instruction register is executed and the next instruction has been fetched from store, then the machine stops with the STEP BY STEP lamp illuminated. Repeatedly pressing the OPERATE bar will thus execute a program one instruction per press.
The normal way to stop the machine when it is running is to press the OBEY button although pressing READ will have the same effect. The machine will finish the current instruction then stop with the STEP BY STEP lamp illuminated.
The RESET button is pressed to stop the machine if the current instruction cannot be completed for example due to a peripheral fault.
The CLEAR STORE button causes all instructions read from store to be executed as no ops, and for a no op instruction to be written back into the store. In this way setting the machine to run with CLEAR STORE pressed (it is a latching button) will eventually set all locations to all zeros. This is called a Clear Store.
The MANUAL DATA button is only active during a "70" instruction. This instruction transfers the value set on the word generator (see below) to the accumulator. If MANUAL DATA is pressed (it is a latching button) the machine will stop with the BUSY lamp illuminated. This gives the operator a chance to change the word generator value before it is transferred. The 70 instruction is allowed to finish by either releasing MANUAL DATA or by pressing the OPERATE bar.
In modern terminology this enables a "Hardware Break Point". In is used in conjunction with the setting on Address 2. When it is pressed, the machine stops immediately before executing either of the instructions in the location set on the Address 2 buttons. The OPERATE bar is used to continue execution.

As described above this is used in conjunction with READ, NORMAL, OPERATE, MANUAL DATA and SELECTED STOP buttons.
It is also used if the machine stops due to a store parity error (PARITY and STEP BY STEP lamps illuminated) or due to a floating point overflow (FLOATING POINT OVERFLOW and STEP BY STEP lamps illuminated).
On the emulator the first condition can never arise (except at power on). Continuing a program run after a floating point overflow is unlikely to produce useful numerical results!

PARITY All reads from the 803's core store are parity checked. If this check fails the lamp illuminates and the machine stops.
BLOCK TRANSFER This lamp comes on in two situations. 1) When a block of data is being transferred between the core store and a peripheral 2) When the CPU is executing a long instruction such as a shift or multiply.
BUSY All peripherals have the ability to make the CPU wait until they are ready. While the CPU is waiting this lamp is illuminated.
FLOATING POINT OVERFLOW If the result of a floating point operation lies outside of the range that can be represented the machine stops with this lamp illuminated.
STEP BY STEP This is illuminated whenever the machine is stopped.
OVERFLOW This lamp is connected to the integer overflow signal. It will often be illuminated during normal program operation.

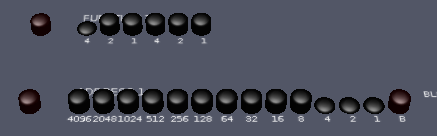
An 803 word consists of 39 bits, and each bit has an associated latching button. The bits in a word are arranged as into two groups of 19 bits with a single bit between them. Each group of 19 bits is further divided into a 6 bit group and a 13 bit group.
The 6 bit groups are an op-codes and the 13 bit groups are an address and together they make up a single instruction.
The 39 buttons of the word generator are laid out to match this structure.
FUNCTION 1 (F1) The 6 bits of the opcode for first instruction in a word. They are labelled with octal digit values.
ADDRESS 1 (N1) The 13 bits of the address for first instruction in a word. They are labelled with their decimal value. This row also has a red button (labelled B) for the bit between the instructions.
FUNCTION 2 (F2) The 6 bits of the opcode for second instruction in a word. They are labelled with octal digit values.
ADDRESS 2 (N2) The 13 bits of the address for second instruction in a word. They are labelled with their decimal value.
Each row also has a red release button which sets all the buttons to their up (zero) state.
The instruction F1 N1 is transferred to the instruction register when the OPERATE bar is pressed in READ mode.
The address N2 is used with the SELECTED STOP button for program debugging.
The left most bit of F1 is referred to a the "sign bit". Toggling its state is used to release an Algol system wait. The left most bit of F2 is used to release an Algol data wait.
F1 is often set to octal 40 (a jump instruction) and F2 is set to a program entry address.

On the real 803 the loud speaker is driven by an amplifier that is connected to the top bit of the instruction register. When the instruction being executed has that bit set the loud speaker is turned on for the duration of the instruction. The volume control reduces the signal sent to the loud speaker.
In the emulator a similar process is used to generate sample data that is sent to the default ALSA sound device. These samples are mixed with the sound effects triggered by pressing and releasing console buttons. These sound effects were recorded by operating buttons on a real 803 console.
The volume control is adjusted by pressing on it and moving the hand.
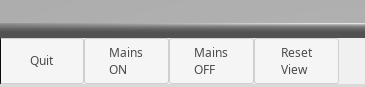
A proper mains isolation switch will be included in a later release. For now use these buttons to turn the mains supply on and off.
This returns the 3D camera to a default position in front of and pointing at the console. Use it if you "get lost" and can't see the console.
While the contents of the core store are saved in a file, other registers are not, so unless a program has explicit suspend and continue features it can only be restarted when the machine is turned on again.
The actual machine emulation has been unchanged for many years. It is paced by the ALSA device's need for new sound samples to keep its buffers full. The "buffer empty" condition was originally detected in the GTK main event loop, but this could cause sound under runs if the event loop was stalled handling some graphics events. In this version the machine emulation and ALSA event polling have been put into their own thread which has eliminated sound under-runs. The emulation thread communicates with the user interface code via thread safe event queues.
There is an "803 simulator" out there on the web which fails to pass the floating point unit test program (X5). It should not be considered to be an accurate simulation because it produced the wrong (in the sense of being different to a real 803) numerical results.
Internally this emulation operates at the "word time" level, performing exactly the same processing steps to execute instructions as the real machine. This allows it to produce exactly the same results as the real machine, right down to the nuances of the mantissa rounding used in the floating point instructions.
The emulation runs ~1.2% slower than the real 803. It creates 14 sound samples for each word time taken by an instruction, which at 48kHz sampling rate gives 14 * 1/48000 = 292 uS per word time compared to 288 uS on the real 803. This is only possible because (as mentioned above) the emulation runs at the "word time level" and exactly follows the steps taken at each word time by the real machine.
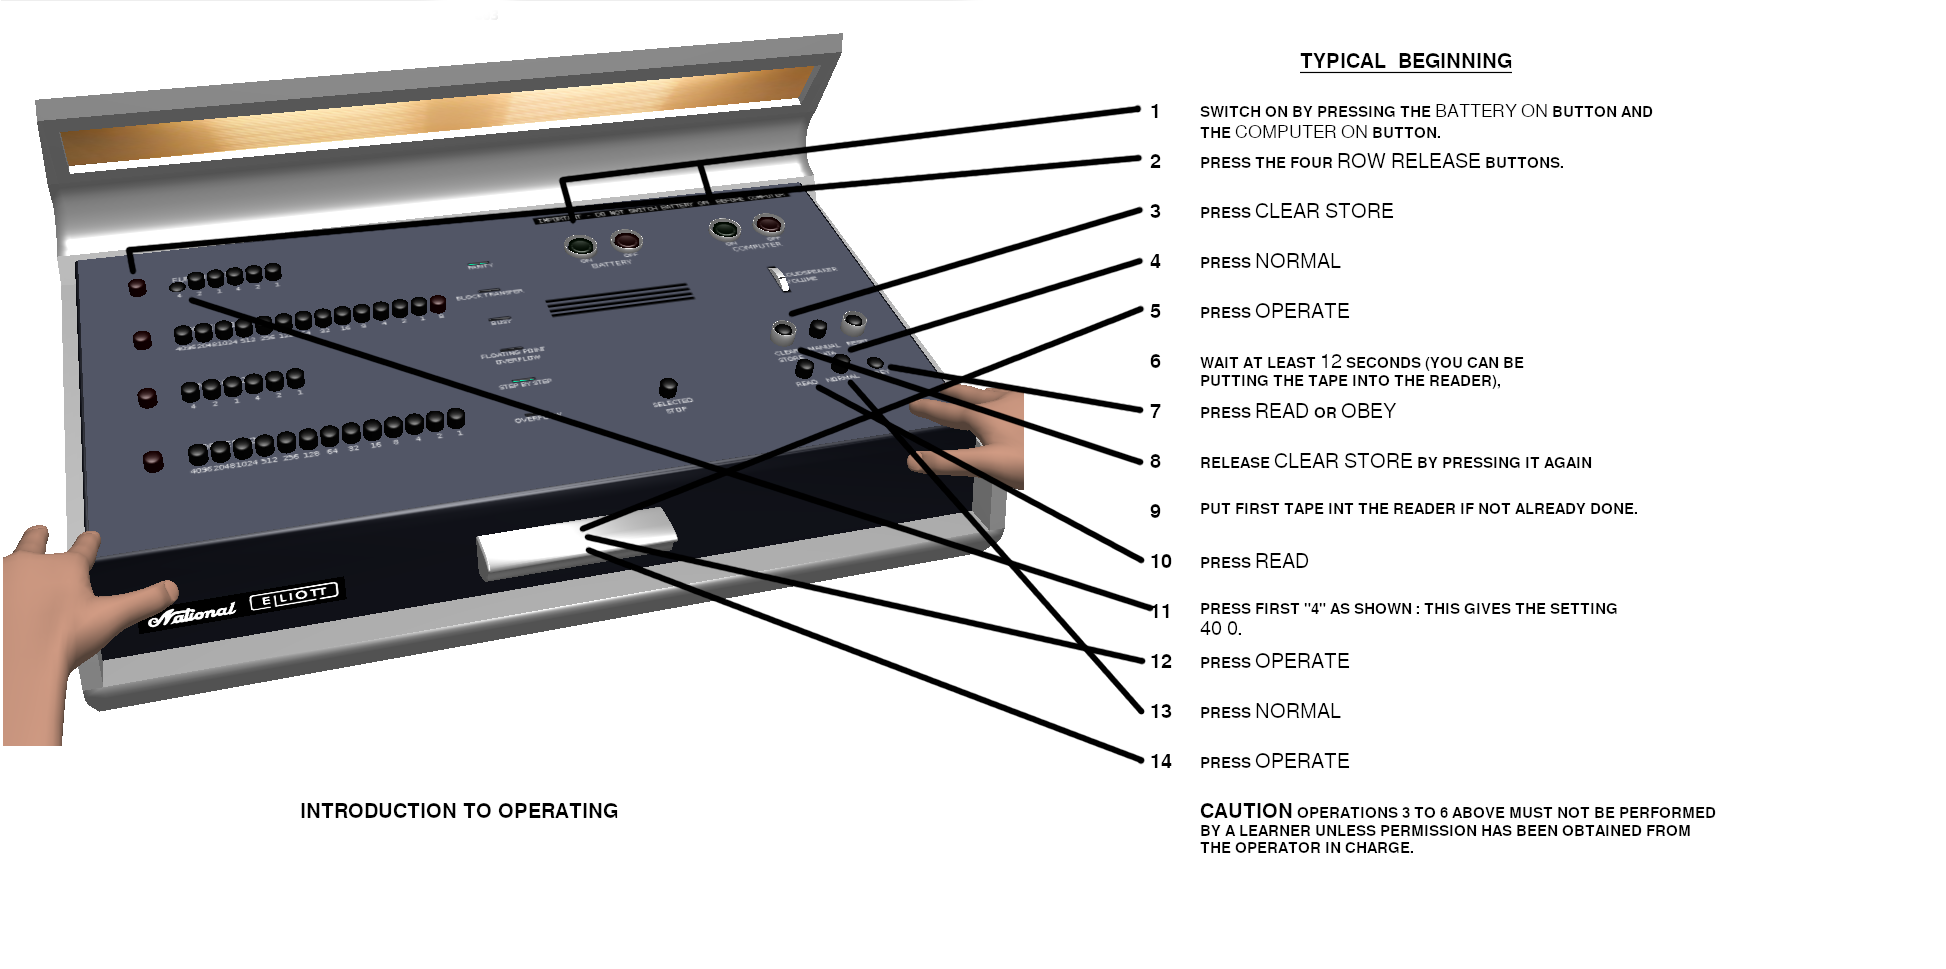
Included in the original 803 documentation is T.I.S. 57.2.8.64 titled "GENERAL OPERATIONS AND MAINTENANCE OF THE 803B COMPUTER". It contains a hand drawn labelled illustration of the operators console, and this has been recreated using a screen shot from the emulator.
"Learner" operators should take particular note in the bottom right hand corner :-)
Don't forget to turn the Mains supply on first, otherwise nothing will happen !
The Paper Less Tape Station (PLTS) can be connected to the emulation before the machine is turned on.
The Computer Off, Battery Off and Mains Off buttons should be pressed (in that order) before the Quit button is pressed.
Elliotts provided an Algol 60 compiler for the 803. It is program A104 in the 803 program library and luckily the paper tapes for this have survived. Successfully running the compiler for the first time (many years ago now) was a major milestone in the emulator development.
The A104 manual is available online, and also an excellent analysis of its internal operation by Bill Purvis.
If you have used Algol 60 before your attention is drawn to the manual section ELLIOTT 803 HARDWARE REPRESENTATION which lists the conventions used to overcome the limited character set available in Elliott five hole telecode.

I was able to get my own copy of the A104 manual signed by the three authors at a seminar they attended in 2008. You may recognise the name "C.A.R. Hoare" as the inventor of the "Quicksort" algorithm who after leaving Elliotts went on to become a famous computer scientist.
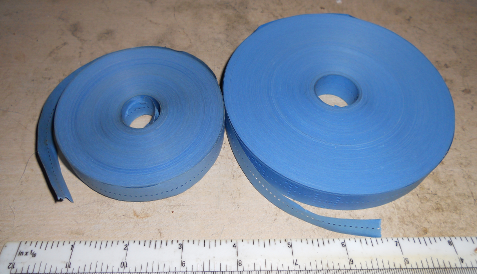
The compiler comes on two paper tapes, known as "Tape One" and Tape "Two" ! If you follow the "Typical beginning" instructions above, and at step 6 (or 9) use the PLTS to put Tape One into the reader, then after the tape has been read the machine will stop while emitting a steady high pitched tone from the loud speaker so make sure the volume is turned up sufficiently. This is called the System Wait. At this point load Tape Two and then toggle the sign bit (left most button on Function 1 row) on the word generator. Once the tape is loaded another System Wait is entered and the compiler is ready to read a program.
See the Paper Less Tape Station User Manual for instructions on using the Tape Editor. Here is a suggestion for your first Algol 60 program:
MULTIPLICATION SQUARE'

BEGIN INTEGER A,B'

FOR A := 0 STEP 1 UNTIL 12 DO
   PRINT SAMELINE,DIGITS(3),A'

FOR A := 1 STEP 1 UNTIL 12 DO
  BEGIN
  PRINT DIGITS(3),A'
  FOR B := 1 STEP 1 UNTIL 12 DO
     PRINT SAMELINE,DIGITS(3),A*B'
  END'
END'
After you have typed it in and saved it to a file, make sure you remember to upload it into the reader. Then release the System Wait and watch and listen in awe as the compiler does its stuff.
When the program has successfully been compiled and is ready to run, the compiler enters a Data Wait which produces a two tone warble from the loud speaker. The wait is released by toggling the left most button on the Function 2 row of the word generator.
The Algol compiler normally runs in a "Load and Go" mode, with the compiler remaining in store while the compiled program runs. In such cases when the program finishes the message "END OF PROGRAM" is printed and a System Wait is entered. To start compiling the next program simply release the wait.
However, there are a number of circumstances where the compiler will stop with a Dynamic Stop which produces a slightly higher pitched tone. In these cases the compiler must be manually restarted by setting up a "Jump to location 7" instruction on the word generator. The sequence READ OPERATE NORMAL OPERATE (which will become second nature) starts the compiler again.
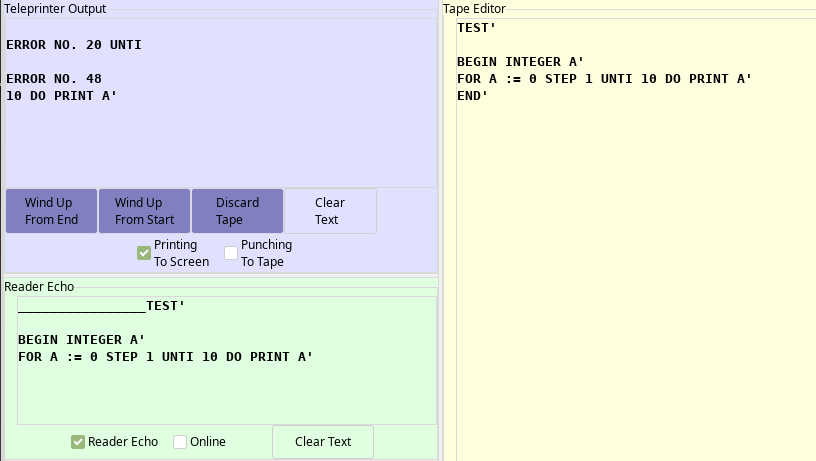
When the compiler finds a syntax error in the program being compiled it copies the text following the error to the teleprinter then stops with a System Wait to allow the operator to gently put a mark on the tape in the reader to show the approximate position of the error. This is the reason the the "Reader Echo" feature is provided in the PLTS, to allow the user to see where the tape stopped after an error. When the System Wait is released the compiler continues to read the program but only checking the syntax for further errors. At the end of the tape the compiler will stop in a Dynamic Stop.
This example shows where the compiler stopped after detecting the missing "L" in "UNTIL".
Algol error numbers are listed on pages 35-37 of the manual
My favourite error is number 49,"Program too large or complex to be compiled at all." I like that "at all" is added at the end so there can be no doubt about it.
Under some circumstances when other windows overlap the emulator window and the view has been moved so that one of the hands is out of sight, then sometimes when the mouse enters the emulator window the cursor is incorrectly warped to a position outside of the emulator window. The exact circumstances are unclear and thus reproducing and fixing the bug is hard !
The hand model came from DennisH2010 https://3dhaupt.com/3d-model-anatomy-rigged-hands-low-poly-vr-ar-game-ready-blender/ The licence is "You can use this rigged hand free for non-commercial or educational purpose." I've used the hand mesh but added my own rigging to get the control I needed to pose the hands and fingers as needed.
Elliott 803B Emulator and OpenGL ES 3 User Interface User Guide by Peter Onion CC BY-NC-SA 4.0![]()
![]()
![]()
![]()
GNU GPL V3 Copyright © 2020 Peter Onion